Thursday 5 May 2016

Applied Animation: Evaluation

Before starting this project, I had no experience using 3D software. For the most part this year I have been creating animation on a strictly two dimensional plane, often creating assets in Photoshop and compositing everything in After Effects. For the Studio Brief, we were required to use Maya to complete a series of tasks involving modelling and animating, which gave us a basic broad understanding of the essentials. It took me a while to get a handle of interface and I'll admit I had trouble in the beginning manipulating basic polygons, however after completing the tasks I am looking forward to sitting down with Maya again and getting to know it's nuances, as 3D to me is an interesting potential creative tool. I do wish I had animated in-betweens for my Moom walk cycle so that the movement were smoother and the truck I modelled could have used some colour and more detailed features, however poor time management and the need to finish my title sequence refrained me from spending as much time as I had hoped to getting to know Maya. 

As for my title sequence, while I do feel it lives up to the potential demonstrated in my animatic, in hindsight probably could have used more mixed media techniques as well as time developing the typographical elements, as I do feel it is a bit lifeless. The intention was to create a detailed graphic style from vectors drawn in Illustrator, however I do feel that some of the assets such as the trees and especially the final shot were poorly drawn and overly simplistic. My characters also lack real expression and animation as I was working with limited assets. If I were to reanimate the characters in my title sequence I would include more facial details, such as blinking and different mouths, though I am happy with the way my characters hair moves when they tilt their head, I do wish I could have included more subtle details such as this in order to really sell the performance. 

For my blog for this module I tried something different, opting for longer blogposts documenting my production as well as my more throughly explaining my thought process in the pre-production stages. I do feel that this has paid off and as a result the quality of my blog has improved, so this is definitely something I will think about carrying over to projects in second year. However, probably my biggest takeaway from this module is how to properly manage workflow in After Effects. When it came to rendering out my animation I went through a lot of trouble, as I exceeded the image buffer size in After Effects, a result of not effectively seeding my compositions and putting too many effects and assets in the main comp. This led to me re-compositing everything in my project the night before the deadline in order to get it to render which was poor use of my time, time which would have been better spent writing for my blog. making additions to my title sequence or refining my work in Maya. In the future I will make sure not to overload the main composition with too many assets and perhaps export my animation in smaller more manageable chunks in order to boost efficiency, as I spent a lot of the day before the hand in for this module waiting for work to render. 


Studio Task: Modelling a Mug in Maya


The final task for this studio brief we were tasked with modelling an everyday object in Maya, so I chose to model a mug with the help of online tutorials and the skills I've picked up by using Maya so far. I created a primitive polygon cylinder to act as the base for my mug. The specifications as stated by the online tutorial were...

Set the Axis to Y
     Set the Radius to 2 
     Set the Height to 4
     
Set the Axis divisions to 10
     
Set the Height divisions to 3
     
Set the Cap divisions to 0

After doing that I selected the top Face by going into Face Mode and using the extrude tool, manipulated the face to shrink it down into a smaller shape, pressing 'g' once I finished and then extruding said face on the Z axis in order to hollow out the cylinder. Once I did that I used the bevel tool to round off the edges towards the top and the smoothing tool to smooth the overall object, applying a lambert texture to make it look more realistic. 

I then created the handle from a primitive cylinder, to which I applied some deformers before merging it with the rest of the mug. Once the handle was in place I combined the two polygonal objects and smoothed out the edges ever so slightly one last time. I then coloured it red and added light to give it more dimension. I used a three-point lighting setup using two spotlights of varying intensity, the main one to light the Left side and a softer one on the right. I turned on raytracing when rendering out my image in order to achieve more complex and deeper shadows.

Overall I am fairly satisfied with my mug, though I do see where there could be room for improvement had I had the time to properly follow a more advanced tutorial. I would also in the future like to create my own textures when modelling objects in Maya so as to claim more authorship over the final products. As it stands however, these three studio tasks have proved useful and garnered me a beginner's level understanding of Maya as well as insight into what the programme is capable of creatively at more advanced levels.

Studio Task: Animating a Walk Cycle in Maya


Moom is a preset character model for use in Maya and it's what I used in my introduction to animating using keyframes in Maya. Moom is already rigged to go, so in order to animated a walk cycle it is all a matter of posing the rig by manipulating it in Maya.


The Richard Williams Walk Cycle I used as reference for my animation

To start off with, Moom needs a flat plane to stand on, so first I created a primitive plane shape. Second, in order to properly mimic the key poses required for a walk cycle, I created another polygonal plain with a texture with a photo taken from Richard Williams Animators Survival Kit applied to it, to use as reference. These were all placed on separate layers to the character rig so that I didn't accidentally select the floor plain when trying to move the character's legs for example.

The way the rig is constructed means that the arms move on a sort of pivot, requiring me to equip the rotation tool in order to simulate movement of the arms. The legs however move just fine with the standard move tool, however one must be careful when using the perspective camera to ensure the legs do not stray too far from the y axis. In order to do this I kept a close eye on the front, side and top views to ensure Moom was walking in a straight line. To create a keyframe I pressed 's' on the keyboard, however Maya has an Auto-Keyframe option to make it easier and more efficient.

The way in which I animated my walk cycle was by animating one element at a time and going back and editing the keyframes until I had the full movement. This mean't starting off my animating the head and body bobbing up and down, then animating the legs and finally the arms. This sort of pose-to-pose animation ensures consistency across all the frames, making for a more believable walk cycle.

Once completing the walk cycle I exported it using the playbast feature, which captures the project workspace and exports it as a quicktime mov. I chose to capture my walk cycle from multiple angles to show off how naturalistic I managed to get the character to move, although in the future I would like to include in-betweens to create a smoother motion, as it stands now the cycle does seem a little too jerky.

Studio Task: Modelling a Truck in Maya


For this module we were expected to get to grips with the basics of Maya. Maya is a piece of industry standard software which allows for both modelling and animation, so for this studio task we were expected to demonstrate a basic understanding of the essentials by creating a simple truck design with the aid of video tutorials on E-Studio. The first thing I did when I loaded up Maya, before starting on my truck design was setting up project folders. This is important as it gives Maya a place to automatically store all the various data types required in the construction of a scene.

For modelling, I used the Polygon Mode of Maya, using Polygon primitive shapes to construct the basis for my truck design. The main body of the truck was constructed from a primitive cube shape, which was then altered using the edge loop tool and Vertex mode, which allowed me to Manipulate the shape, giving the front of the top of the truck a sloping shape. I then froze this transformation and deleted its history, which allows me to move the object wherever I wish.

After creating the body I constructed a base from another primitive cube shape, however this time I manipulated and deformed it to make it more of a flat rectangular shape. I then snapped this to the body of the truck and used the bevel tool to smooth the edges around the back to give it less harsh edges. Lastly I constructed the wheels and the axis from primitive cylinders which I widened and narrowed. After that I combined the wheel and the axis into the same mesh and copied it in order to create four wheels, using the different perspective cameras to align them with the rest of the truck.

As it stands I still have quite a way to go with Maya. I am not so used to the complex interface and creating assets along three different axis'. However I do feel that by creating an object as simple as a truck, I have garnered a greater understanding of the software and can certainly see it's potential. I am particularly interested in how Maya uses ray tracing, lighting and shadows, features I stumbled across while rendering my truck. Creating lighting and camera rigs which work in 3D space is an area of Maya that does greatly interest me, so I look forward to using it again once I come to terms with the interface.

Creating Assets and Compositing my Title Sequence

For my title sequence I created the assets in Adobe Illustrator, to emulate a graphic, vector based style. I used the book as reference when creating the assets for my title sequence, remixing and repurposing what I deemed the most memorable and thematically relevant visuals from the comic. Most of the imagery used in my title sequence was from the short story The Nesting Place, the one I have chosen to adapt, however for the sake of diversity I chose to adapt imagery from some of the other stories too. Using the pen tool in Illustrator, I constructed the assets needed for my project using the imagery in the book as reference.


My Title sequence was composited in Adobe After Effects using vector-based assets created in Illustrator. After Effects is ideal for compositing sequences of 2D motion graphics as it's user interface is very similar to Photoshop. The aesthetic of my animation is more in keeping with motion graphic title sequences rather than traditional full animation, with emphasis on the arrangement and composition of imagery.


The layers in my project are generally organised in the order in which they appear sequentially in the animation. As there is a lot of motion in my title sequence, with movement of the camera, I enabled motion blur in order to achieve a more natural filmic look.


One of the most immediately recognisable pieces of imagery from the book is the blood-red full moon which is why I decided to start off my title sequence with it. The prologue of the book also contains this imagery accompanied by a snowy scene with a hooded blue figure making their way through a blizzard, so I decided to combine these two elements to create the opening shot of my animation. I wanted to give the impression that the hooded character was making their way through a blizzard in the opening shot, so I animated a character whose hood blew in the wind in Photoshop before importing it into After Effects as footage. This is one of the only assets in my project created in Photoshop, and that is non-vector/raster based.


Most of the environmental effects featured in my title sequence were created in After Effects using the effects filters. The snow in the opening shot and the water dripping in the cave derive from preset effect options in After Effects, though initially I did consider creating the individual assets in Illustrator separately.


Originally, for the cave shot I included a light sweep on the main character's lantern, however my tutor did not feel it fit with the aesthetic of the title sequence as a whole. Upon reflection, the light sweep does stand out amongst the composition. That coupled with the poor way in which I implemented it and the effect the sweep of light had on the edges of the frame led me to scrap this idea for the final animation.


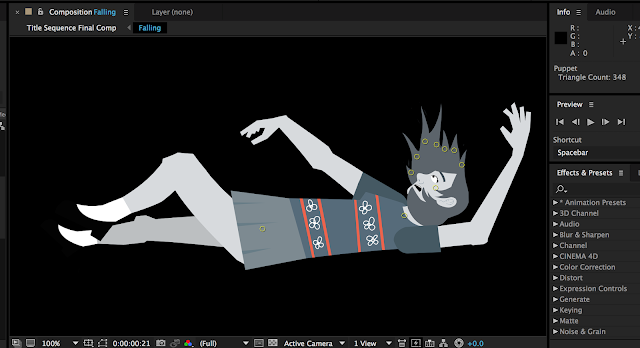
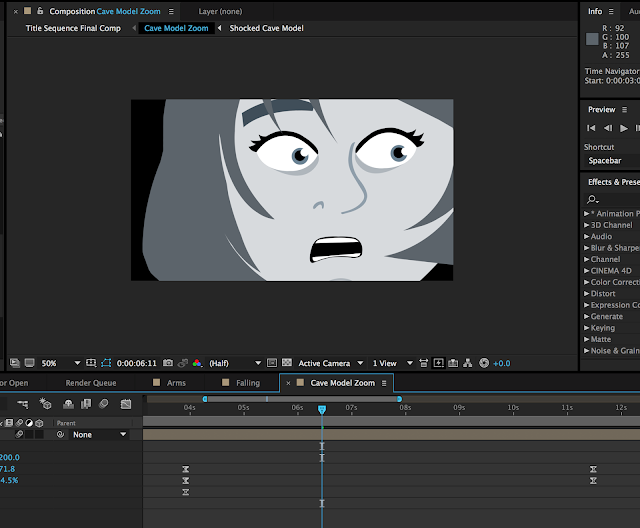
The main character in my animation has a number of different models requiring different degrees of mobility. Probably the most animated of these is the first model of the character falling. For this I created the model in a separate composition, animating the limbs using the puppet pin tool. In order to give the illusion of falling I also used puppet pins to animate the hair blowing in the wind as the character descends. The model of the character in the cave was also complex and animated using the same method, however with more facial detail. I also used puppet pins on the hair of the character to simulate secondary action in order to give the movement of her head more believability.


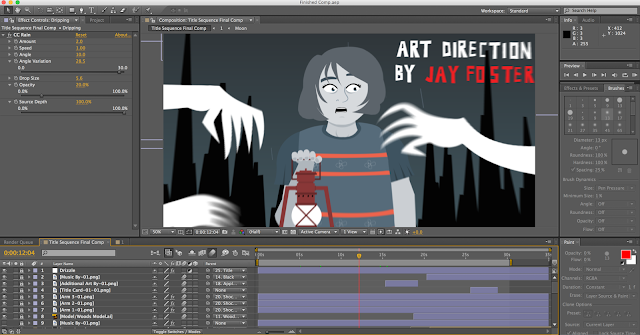
During the early stages of compositing my title sequence I was considering straying away from my animatic when the camera zooms in on the character's pupil before it turns into an apple with a bite taken out of it. This was because I was not aware you could import Illustrator files directly into After Effects and up until this point i had been importing the files saved out of illustrator as PNGs. These appeared too blurry when zoomed in properly so I opted for a different method of transition between scene with the lantern illuminating the camera with a blinding white light. However, most of my peers found this transition jarring and not in keeping with the style of the sequence up until this point, which was a single continuous camera move. So, I instead opted to go by my storyboard and imported the Illustrator file into After Effects, retaining the layer sizes and reworked the animation so that when I zoomed into the character's face for the transition, the assets didn't get all blurry. It worked and the intended effect is, in my opinion, stronger than the compromise I almost ended up going with.

One of the biggest problems I had with my animation came to fruition when it came to render it out in After Effects. The image buffer size was too large for the project and as a result kept crashing when it came to rendering out my animation. To amend this I used the college computers and rendered the project off the native disk rather than my external hard drive, as I was told this may be one of the factors causing it to crash. Still, the final render did end up taking a lot longer than I would have hoped thanks in no small part to me overloading the project files. In the future I will be sure to work on my After Effects projects in smaller, much more manageable chunks in order to bypass this frustration.


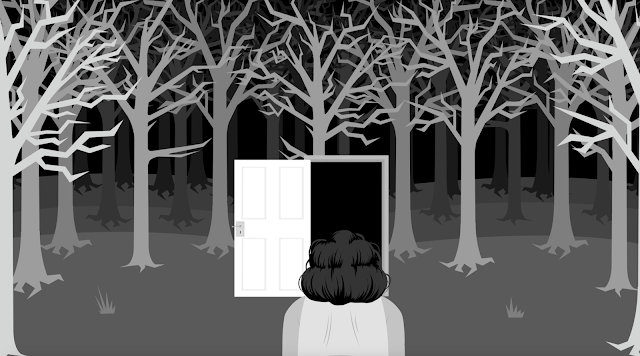
Overall I am satisfied with how closely my final animation follows my animatic, however I do wish that I could go back and simplify the graphics and colour palette somewhat. I feel that while I do think my animation effectively mimics the stylings of the book, I would have liked to incorporate more textures, maybe creating my own from found objects such as newspaper clippings or cardboard cutouts. Another area I feel I could have improved upon given more time is the typography, which I feel could have had some more creative application and placement within the scenes, making use of distortion and perspective a little more. I did apply a drizzle effect to the text which appears in the cave to reflect the water dripping from the rock, however I feel this effect kind of passes by a little too fast on screen and I would have liked to experiment with those sorts of motifs a little more in my title sequence. The last shot of the girl standing in front of the door in the middle of the woods was also a little static requiring a little more animation next time. I feel that it would have been improved had I shown her walking through the door or by showing something, a creature maybe coming out of it, and as it stands the last shot falls a little flat for me.

Designing the Type and Title Card

Typography plays a large part in title sequences. Displaying the names of the people who worked on the project is the primary function of a title sequence, so ensuring the text is not only easily readable and aesthetically pleasing is a major priority when considering type. For my title sequence I created my own font in Illustrator, modelled off the font used in the 2007 French anthology film 'Peur(s) du noir' or 'Fear(s) of the Dark' as it translates in English. 


The title sequence for this film is simple and minimalistic relying entirely on the typography and the accompanying soundtrack to communicate a grim, dreadful mood. What appeals to me about this typeface is how it is simultaneously uniform and modern and at the same time distorted and edgy. It reminds me of the typefaces used by Saul Bass on posters for Hitchcock films such as Vertigo and North By Northwest. While my title sequence is of a different genre, I feel that it is appropriate to borrow a few stylistic tropes and devices from people like Hitchcock, whose often described as being the 'master of suspense' in order to lend an air of dread to my title sequence.


In order to create my own Saul Bass-inspired typeface I created each individual letter as a vector in Illustrator before rearranging them into the order of words and exporting them as PNGs to be imported into After Effects. The type in my animation abides by the same black, red and white colour scheme most of the rest of the title sequence follows, with the names of the people in the credits highlighted in Red for emphasis.


The title card I created incorporates this colour scheme as well as the key imagery of an apple with a bite taken out of it. I went through several variations of this design before settling on the final design with the text inside of the apple. I chose this because the apple provides a red background for the text which allows for the white and black heading and subheading respectively to stand out and be highlighted.


Tuesday 3 May 2016

Sound in my Title Sequence

Title sequences, by their very nature, rely on sound just as much as they rely on image to communicate the intention of the show in a short timeframe, which is why I decided to put some thought into this aspect of the titles early on in the pre-production in order to design around the audio cues and ensure a harmonious audio/visual experience.

The first step I took after coming up with my storyboard was to create an appropriate soundscape which fit the tone of the book I was adapting. For this I needed to isolate a short 30-second snippet of a song with a grim, moody tone, which went through peaks and troughs, roughly following the structure of having a distinctive beginning middle and end. For this I considered a number of songs from a variety of artists. 

Sycamore Trees by Jimmy Scott


As my title sequence was for an adaptation of a book with a distinctly woodland setting I thought about incorporating part of the Twin Peaks soundtrack into my title sequence, with lyrics referencing Sycamore Trees, often nicknamed 'ghost trees' as I thought this might tie in to my story thematically, however I opted not to use it as I found the song to be overly long and not right for the tone.

Spider Monkey by Beth Gibbons and Rustin Man


Another song I considered for my title sequence was Beth Gibbons 'Spider Monkey' as I felt the meandering instrumentals would flow with my title sequence very well. The song also goes through several stages of rising tension which felt would lend an air of excitement to the title sequence. However, while I was a fan of the instrumental and the lyrics did fit the theme of the book to some extent, I found editing it down to a 30-second chunk near impossible and abandoned the idea in favour of 'Danny the Dog' by Massive Attack. 

Danny the Dog by Massive Attack


This song was ideal as it is fairly long with a heavy emphasis on thumping drums and drawn out piano chords which lend a sense of dread, which is something I am hoping to instil. However, due to the slow pace I was forced to edit the song down, condensing the individual instrumental verses into three individual 'acts' signifying the beginning middle and end. I wanted the transition from one verse to another to be like acts of a story, with their own distinct moods which evoked a sense of rising tension to some extent.  Elements of the instrumental I feel reflect aspects of my storyboards as well, for example, the echoing violins in the first half of the track give me personally the sensation of falling, which happens to one of the characters in my title sequence.

What was also important was that I end the title sequence with some sort of musical sting in order to punctuate the title and give it significance, as I found this to be something a lot of title sequences do. For this I narrowed the track down to a single moment at 1:11, which my heavily condensed edited version of the track used for my titles will gradually lead into and end on for the stinger moment.